Getting started
This page assumes you have never seen Runphase. It covers finding it after installation, then taking one change all the way through: plan, window, steps, verification, record.
Allow about ten minutes. You will need a Jira issue representing a change you can safely practise on.
The shape of a run
Every run moves through the same four screens, in order. This is the whole product in one pass; the sections after it do each stage properly.
1. Finding Runphase
Runphase appears in two places and they do different jobs. The entry in the Jira sidebar is the application. The panel on an issue is that one issue's view of it.
The sidebar entry
Open Apps in the Jira sidebar. Runphase is listed under Your apps and expands into three pages.
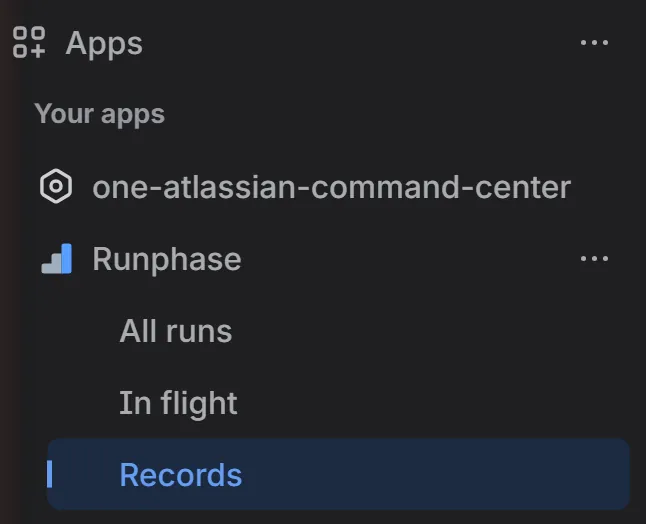
| Page | What it lists |
|---|---|
| All runs | Every run on the site, in any state. |
| In flight | Only runs that are still open: drafts, plans waiting for a window, and anything executing right now. |
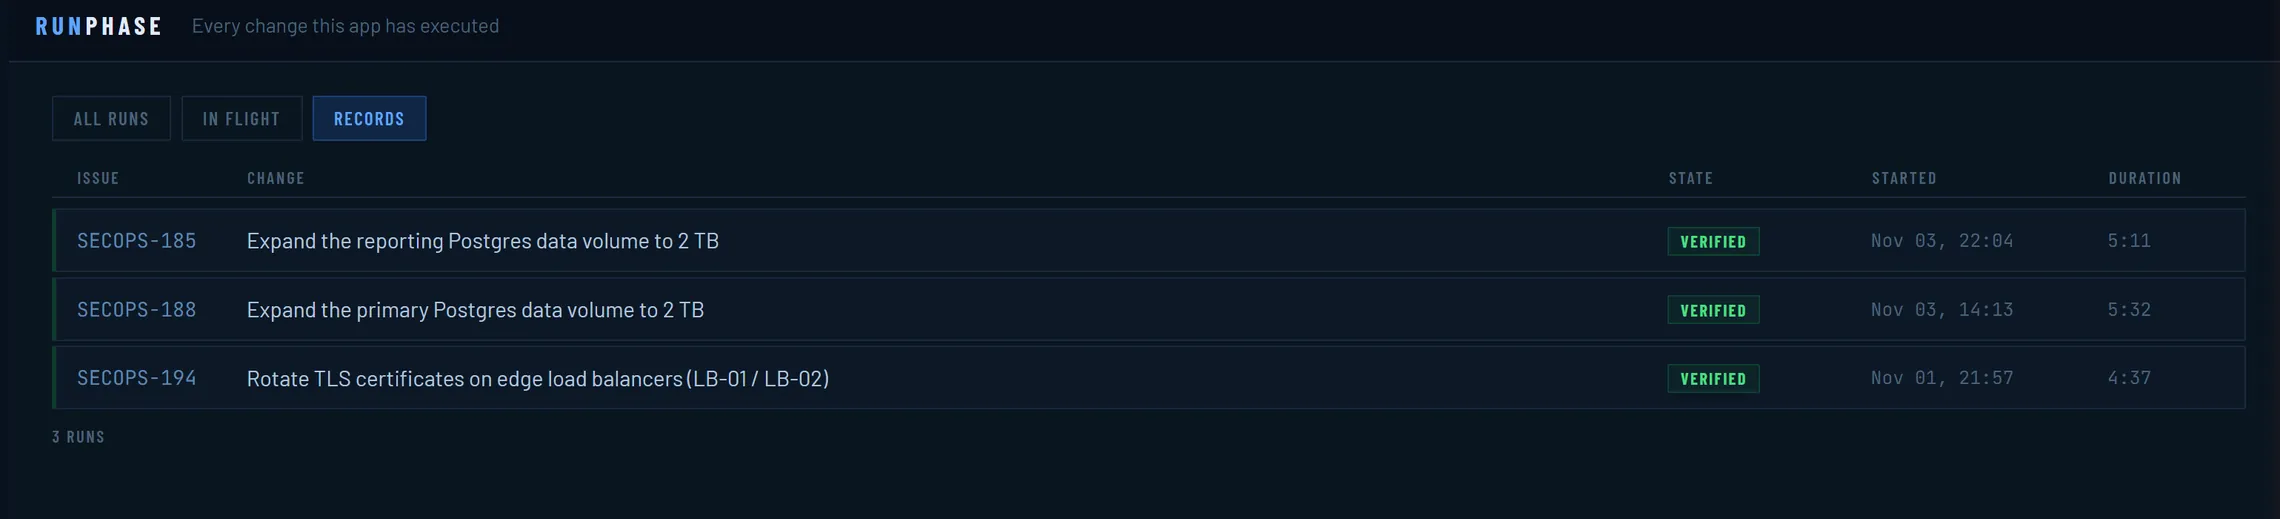
| Records | Closed runs only. This is the audit trail. |
The panel on an issue
A run always belongs to one Jira issue, and that issue can carry a panel showing the run's state without anyone leaving Jira. The panel is not there by default. Somebody with edit permission adds it once, using the Runphase button in the action row under the issue title.


That click is per issue, not per person. Jira remembers the panel for the issue, so once anyone with edit permission has opened it, everyone who views that issue sees it too, including people who cannot edit anything.
Jira administrators can skip the step on every issue at once: open the panel, then use Show for all work items from the panel's own menu. That option is only available to administrators.
The panel is a summary. It links through to the full page, with Prepare the run ↗ while the plan is still being written and Open run record ↗ once the run has closed. That link lands on the same place the sidebar entry does.
2. Creating a run
A run always belongs to one Jira issue. That issue is the change; the run is the execution of it.
- From the issue panel, create a run for this change.
Or open the full page and create one there, choosing the issue.
- The run opens in
DRAFTon the Prepare screen.DRAFTmeans the plan is still a working copy. You can change anything, and nothing is frozen yet.
3. Preparing the plan
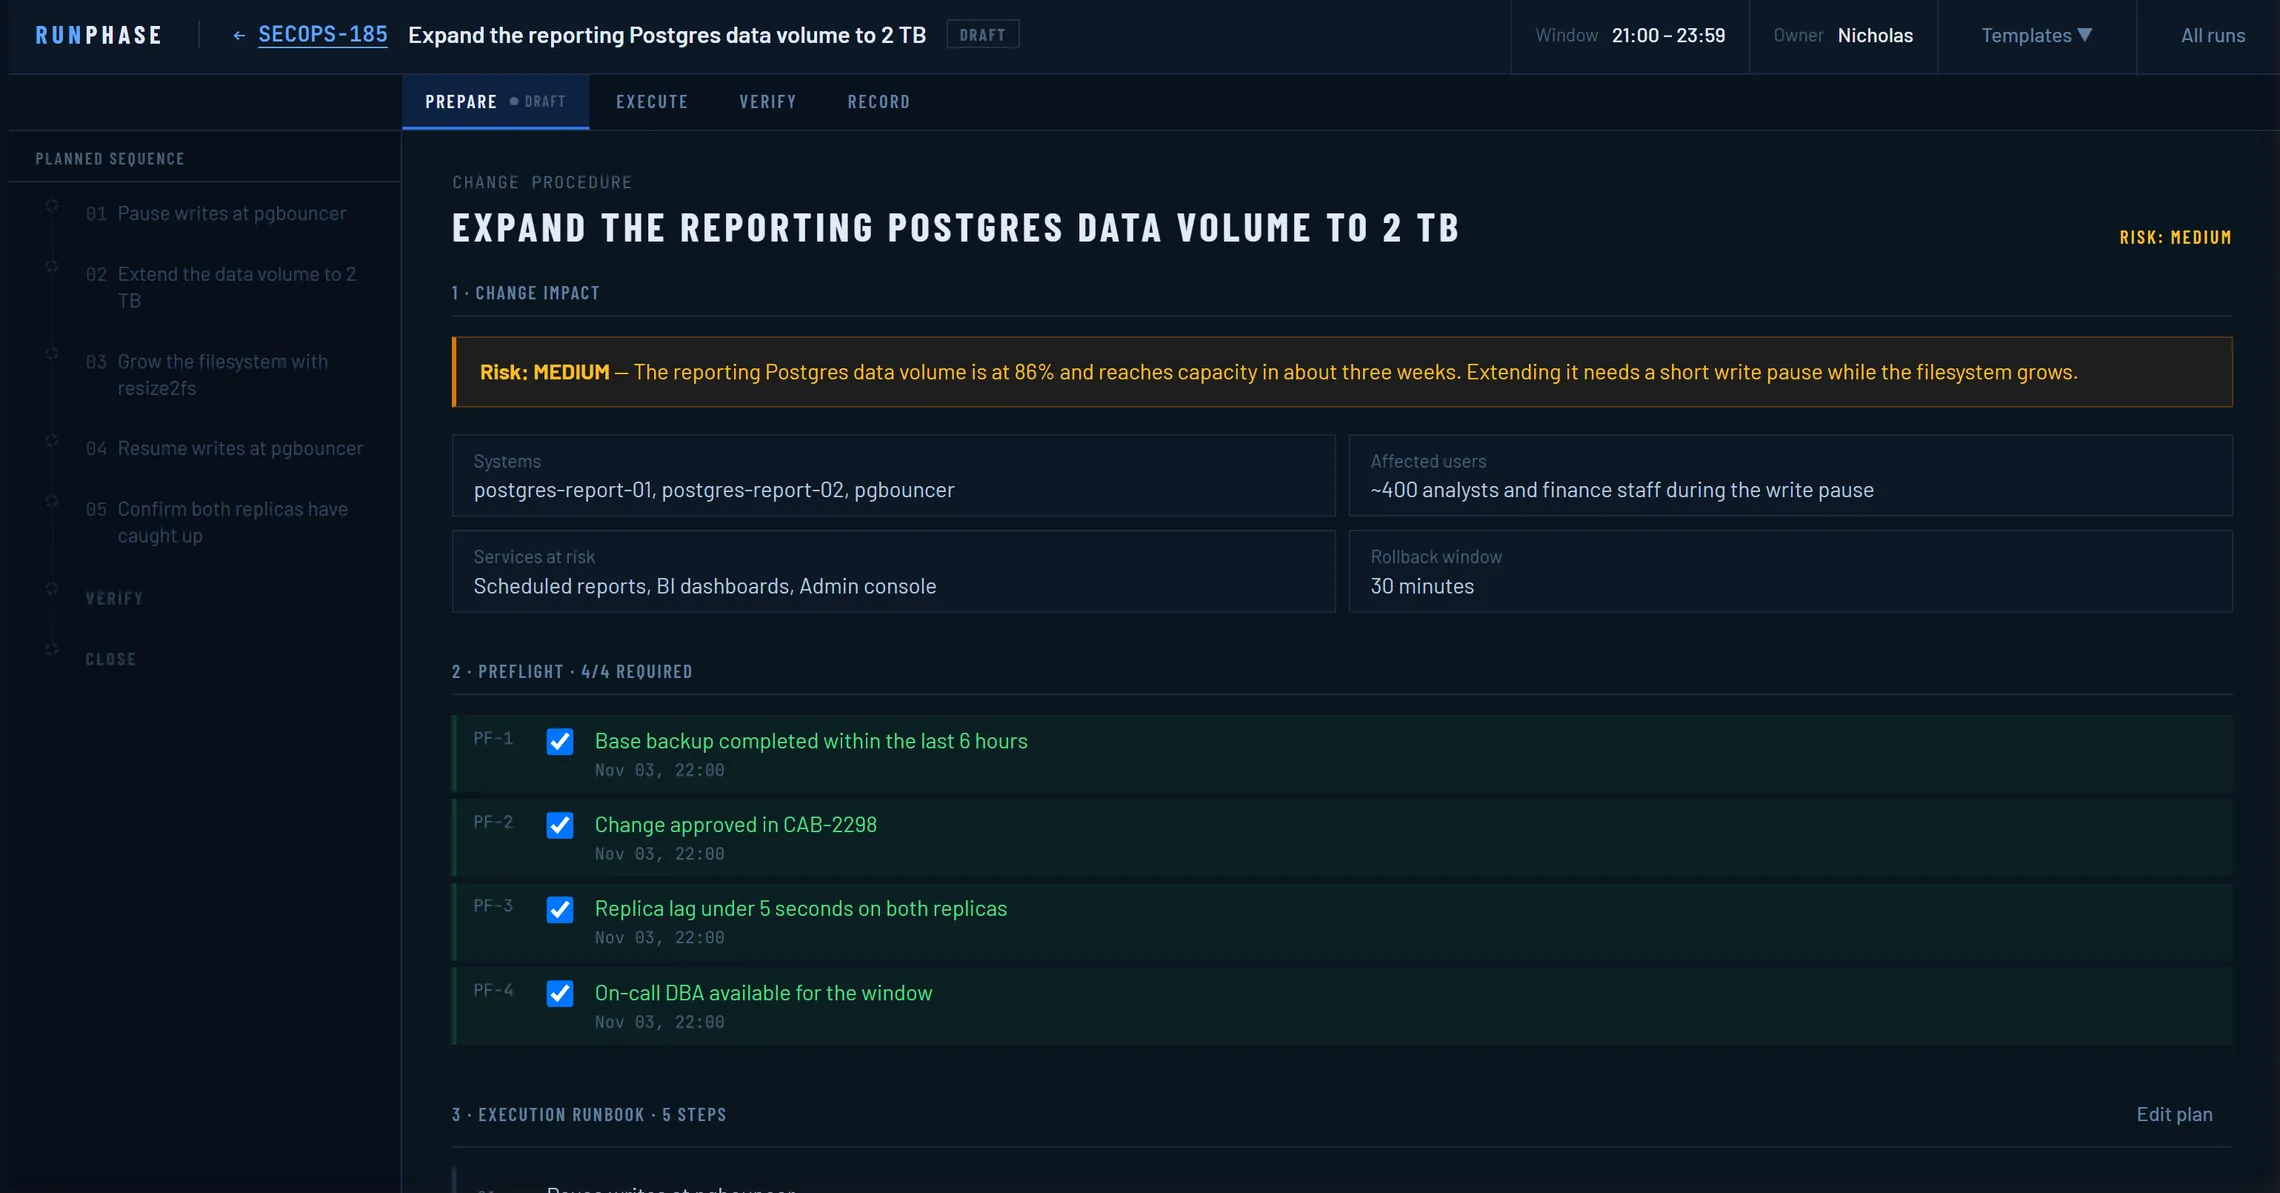
This is the part worth doing properly, because it is the only part you do while there is time to think. Everything here is written before the window opens.
The Prepare screen has these sections:
| Section | What goes in it |
|---|---|
| Change procedure | What this change is, in a sentence or two. The context someone needs who arrives at the record in six months. |
| Change impact | Systems, Services at risk and Affected users: who notices if this goes wrong. Optional, but it is what makes a record readable later. |
| Maintenance window | When the change is planned for. The record later compares this against when it actually happened. |
| Preflight checklist | What must be true before you start. Backups taken, change approved, the right people awake. |
| Runbook steps | The ordered procedure. One action per step. |
| Success criteria | How you will prove the change worked. Not the same as the steps. |
| Rollback trigger, Rollback procedure, Rollback window | The condition under which you would turn back, the ordered steps to do it, and how long that takes. |
Writing the steps
- Use Add step for each action.
The field prompts you with the shape it wants: What you do, e.g. Drain traffic from node A. Keep one action per step. A step that contains "and then" should be two.
- Fill in Expected result where it
helps.
Optional, and described on screen as how you know it worked. This is for the person executing at 2am who did not write the plan.
- Use Remove to delete a step while
the run is still in
DRAFT.
Writing the success criteria
Use Add criterion. The difference from steps matters enough to repeat:
Steps are what you do. Criteria are how you prove it worked.
"Restart the service" is a step. "The service answers on port 443 with a valid certificate" is a criterion. Completing every step does not close a run successfully. The criteria decide that.
Writing the rollback
Write this now, not during the window. A rollback plan improvised while something is broken is the one you regret.
- Fill in Rollback trigger.
The condition under which you would turn back. "Error rate above 2% for five minutes", not "if it goes wrong".
- Add the procedure with
Add rollback step.
Ordered, same as the runbook.
- Set Rollback window if you know roughly how long recovery takes.
Saving
- Save plan keeps your work while
the run stays in
DRAFT. Save as often as you like. - Mark ready freezes the plan and
moves the run to
READY.Do this when the plan is finished and you are waiting for the window. From here the plan is no longer a working copy.
4. Running the window
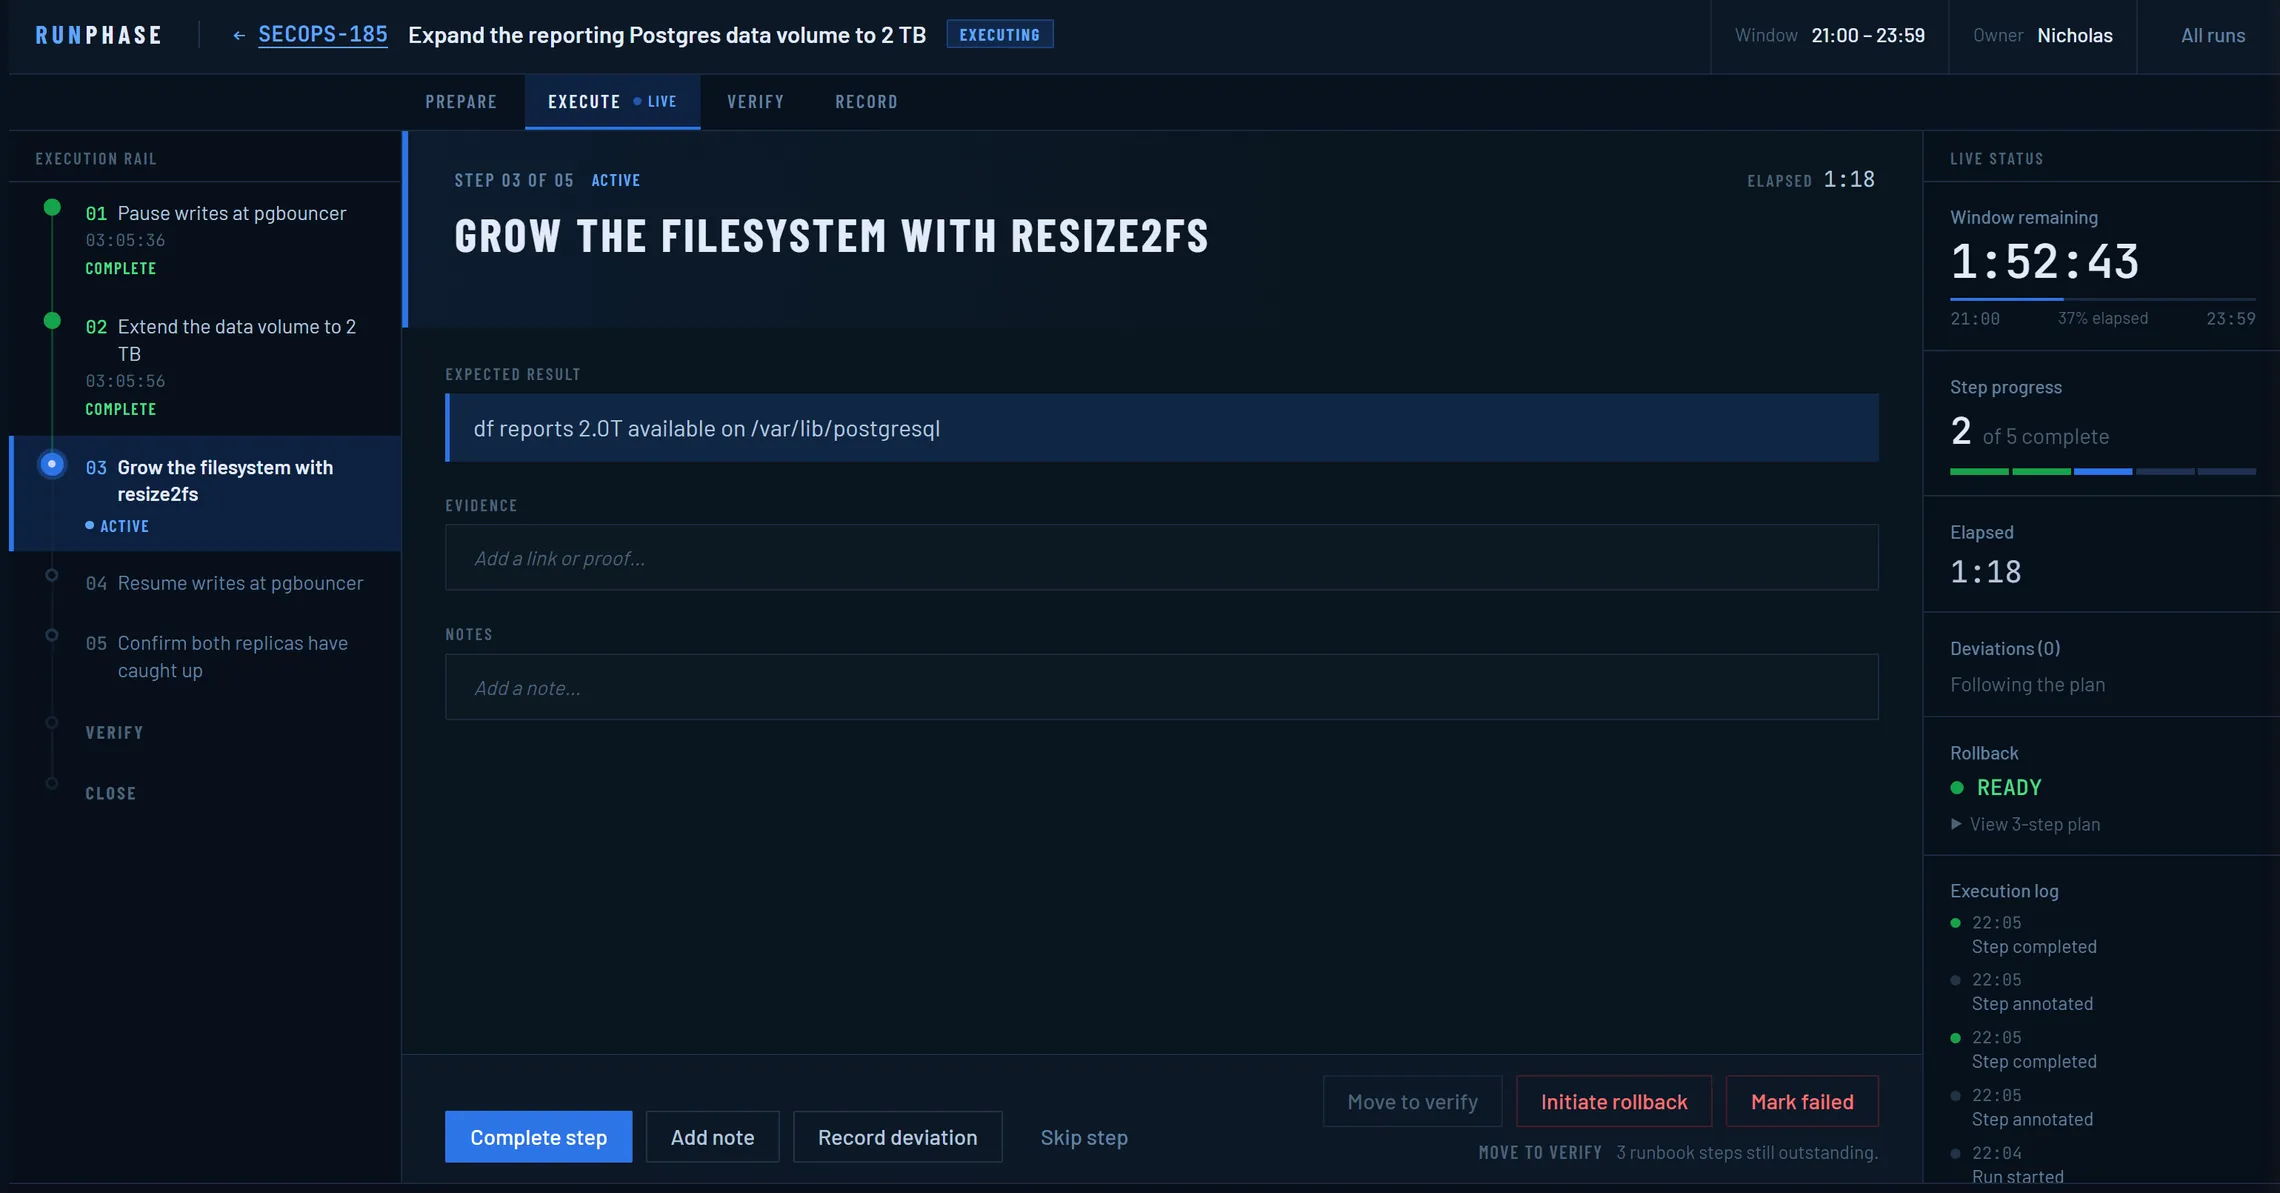
- Start run when the window opens.
The run moves to
ACTIVEand the Execute screen takes over. The actual start time is recorded from this moment, and the record will compare it against the planned window. - Work the current step.
There is exactly one current step at a time, so there is never a question about where the change has got to. Step progress and Elapsed stay visible throughout.
- Complete step when it is done, which advances to the next one.
- Add notes and evidence as you go with
Add note and
Add evidence.
Evidence takes a link or proof: a dashboard URL, a paste of command output. Adding it while you are there is much easier than reconstructing it afterwards.
Rollback readiness stays visible for the whole active run. Initiate rollback is always within reach, so "could we still back out of this?" is never a search through a document.
When reality departs from the plan
Use Record deviation. This is the feature that makes the record worth having. See recording a deviation for what to write.
Deviations are appended. Recording one never rewrites the planned sequence, so the record shows the plan and what actually happened side by side.
5. Verifying
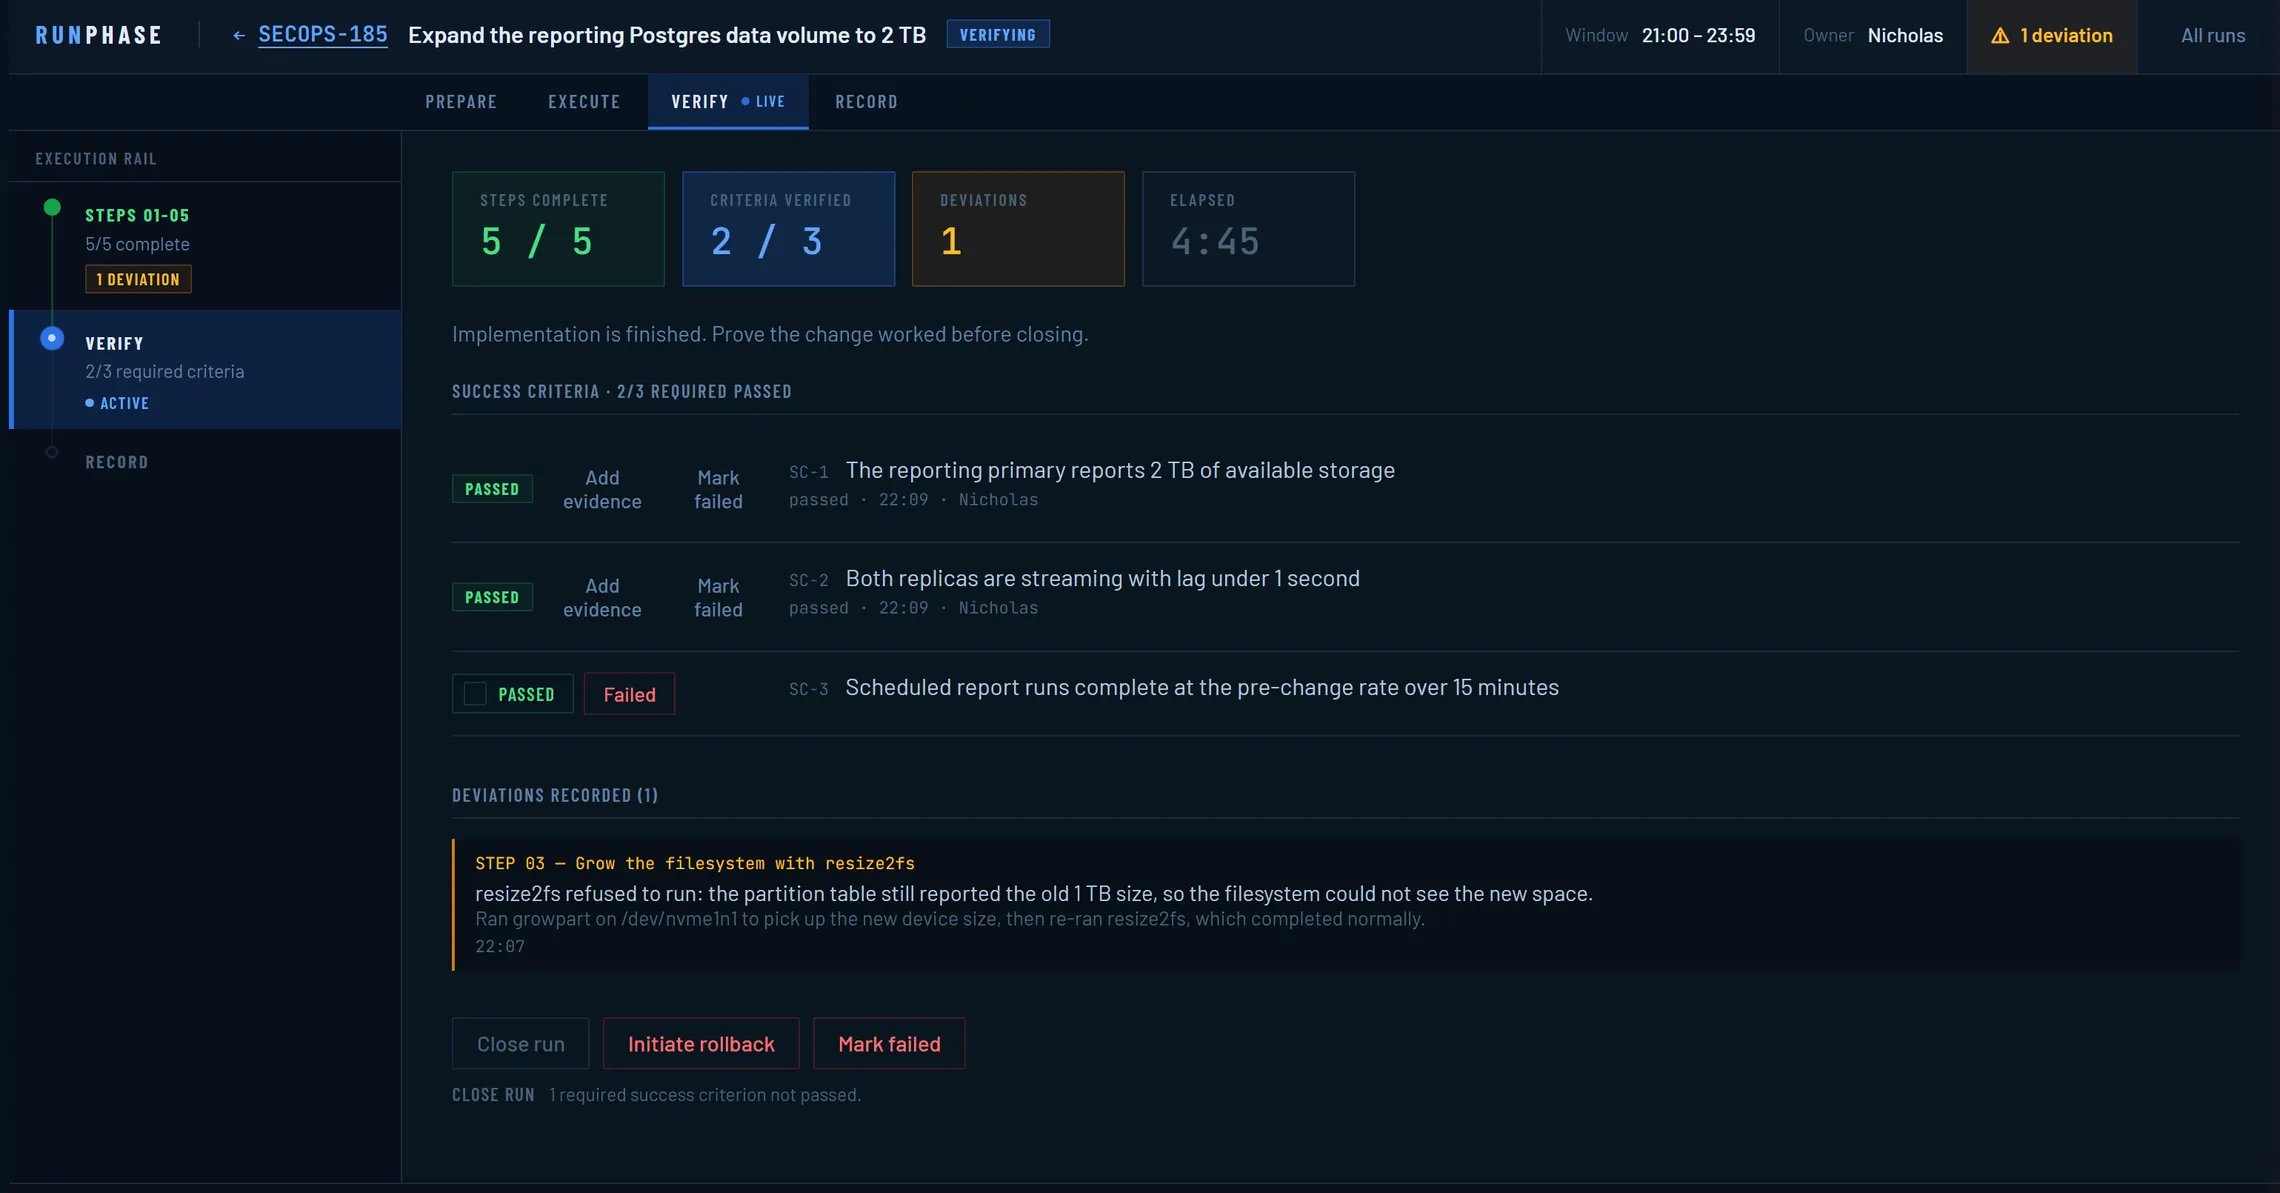
- Verify once the work is done.
The run moves to
VERIFYING. The steps are finished; now the criteria decide the outcome. - Work through the criteria, using
Mark this criterion passed for each one you have
proved.
Criteria verified, Steps complete and Deviations are shown together, so you can see what the run amounts to before closing it.
6. Closing
- Close run once every required
criterion has passed.
The run becomes
VERIFIED, terminal and immutable. - Or Mark failed if the change did
not work and you are not rolling back.
The run becomes
FAILED. This is a legitimate outcome, and a recorded failure is far more useful than a run abandoned half-finished.
Terminal states are immutable. A closed run does not go back to being editable, by anyone. That is the point of it. A record that can be quietly corrected afterwards is not a record.
7. Reading the record
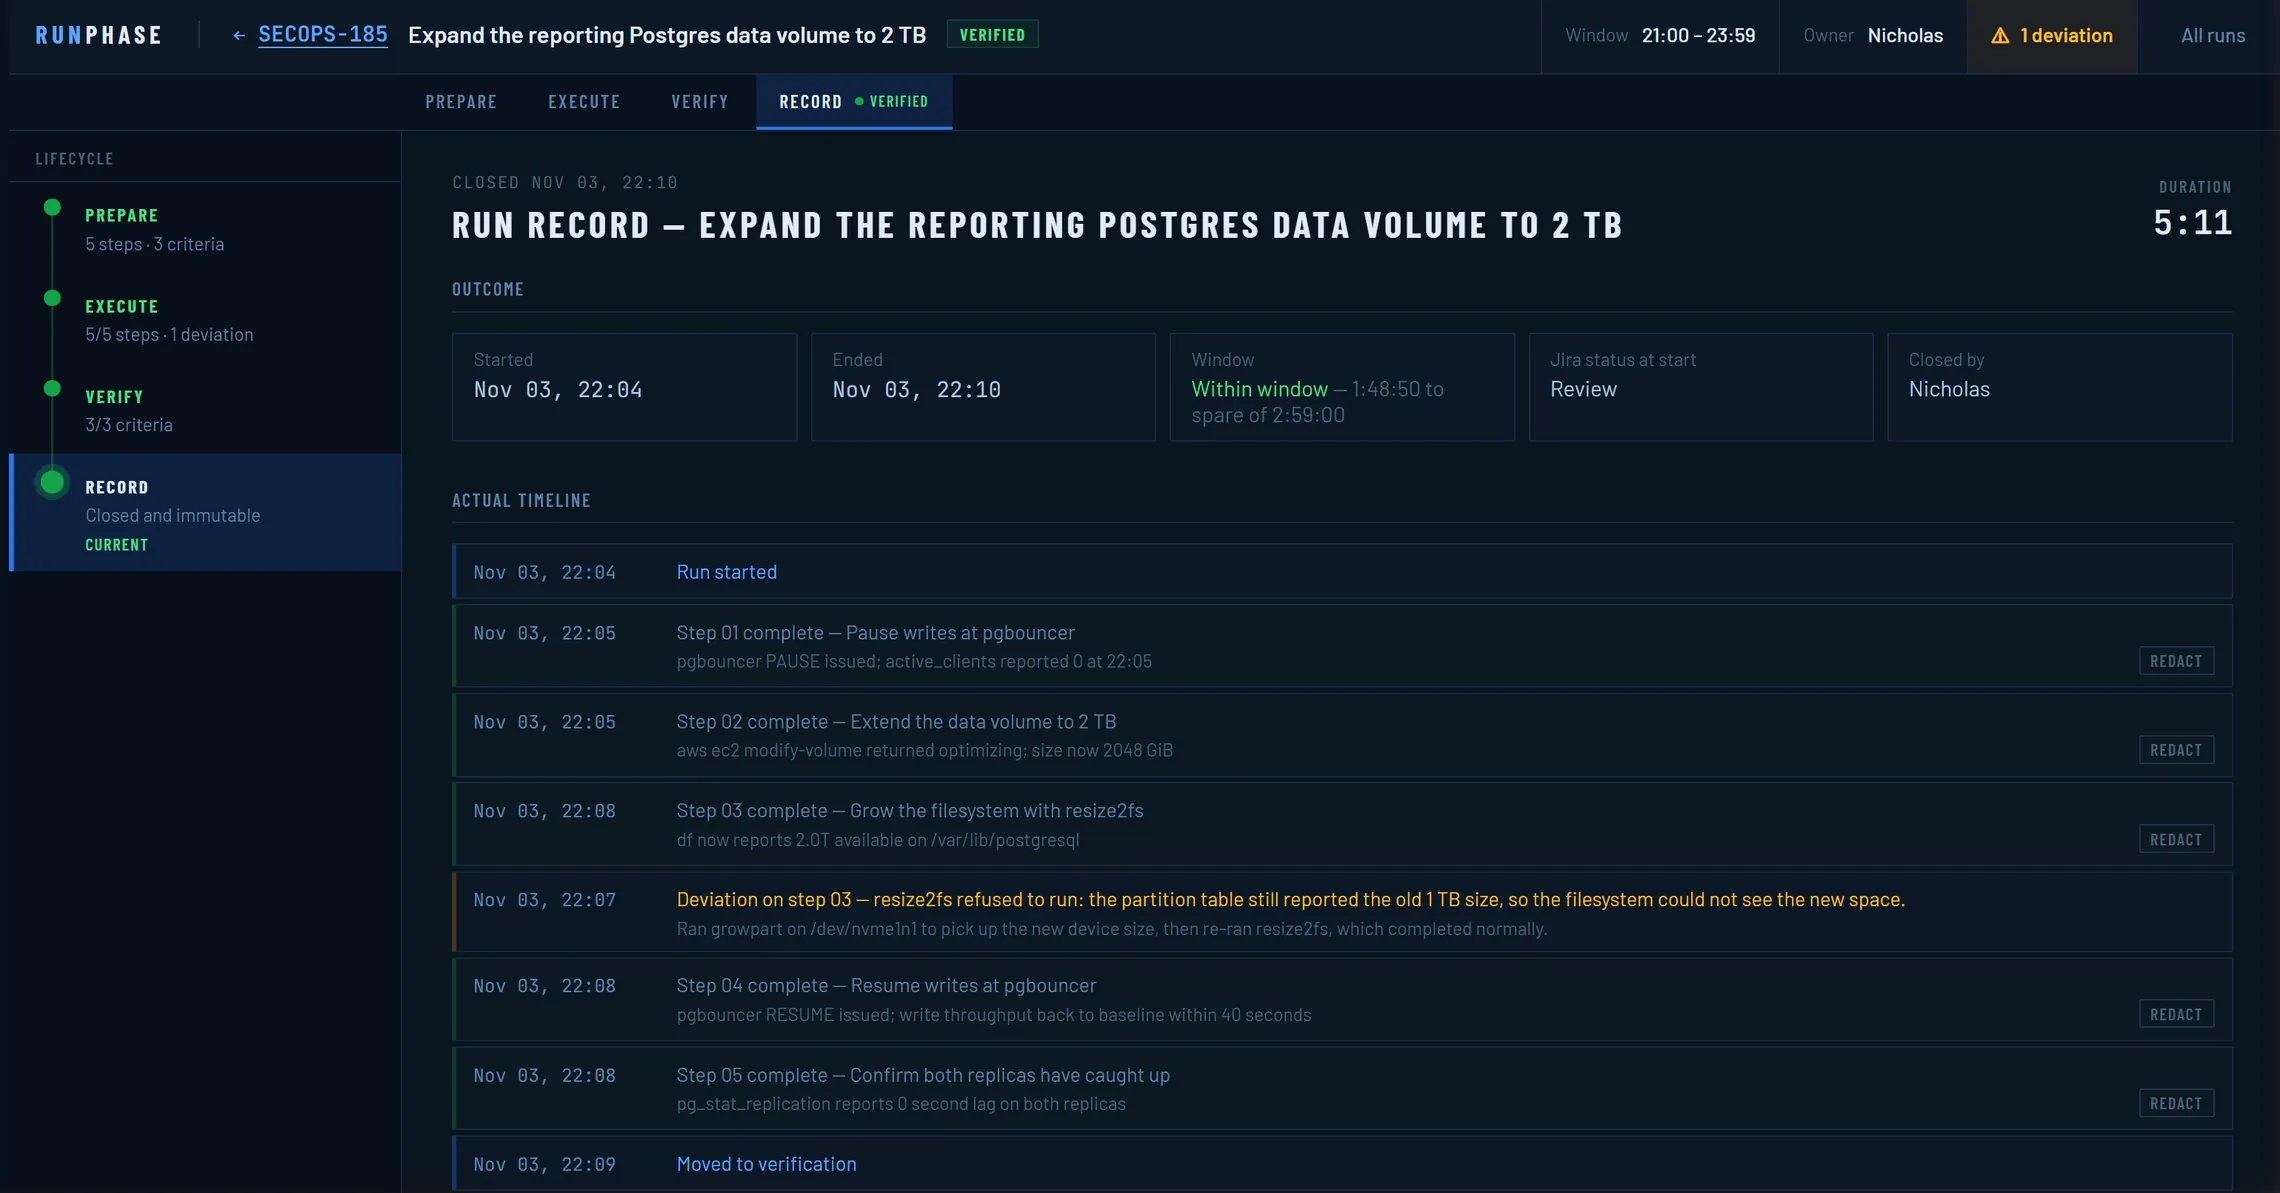
A closed run becomes a calm, read-only account: the issue, Outcome, Owner, Window against Started and Ended, Closed by, the Actual timeline beside the Planned sequence, every deviation, the verification results, whether Rollback was used, and the notes and evidence you added.
Jira status at start captures how the issue looked when the window opened, which is the detail nobody thinks to record and everybody later wants.
Export produces a Markdown copy for pasting into a post-incident review or an audit response.
What next
- Save that plan as a template with Save as template, if it is a procedure you will run again. See saving and reusing a template.
- Add the dashboard gadget so the team can see what is in flight without opening anything.
- Read the reference for the full state machine and what the app deliberately does not do.